Order Numbers can be either a specific number entered by the operator, or generated consecutively through the POS Terminal settings.
Order Numbers can print on the Receipt, Kitchen Printers and Kitchen Monitor.
Order Numbers are able to be controlled through the POS Server, which can ensure that each order number is used consecutively through a number of POS terminals.
Order Numbers are generally used in a Café or Bistro environment where Table Numbers are not allocated permanently and a number is given to each customer as they place their order at the counter.
Order Numbers can be used again and again over the course of a day without issue.
It is merely a way to keep track of what meal goes to which Customer.
They are also used in conjunction with some paging systems.
Order Numbers may require you to use the POSServer program.
This can be configured by going to Setup > Global Options > Miscellaneous > POS Server.
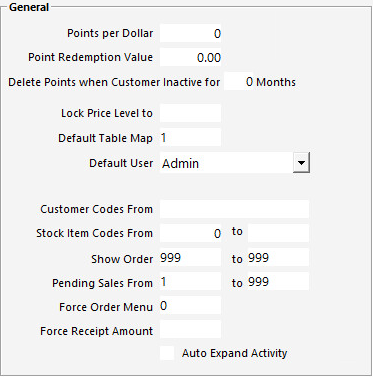
Go to Setup > POS Terminals > Modify the POS Terminal you want > Miscellaneous > General.
Configure Show Order and Force Order Menu
Go to: Back Office > Setup > POS Terminals > Miscellaneous > General.
Show Order is to set a range of numbers to the selected POS Terminal so it only has these numbers to use when issuing an order.
Once the order number reaches the limit it will restart the order number count.
Different POS Terminals can use a different range of Order Numbers.
Force Order Menu must be set to 0 for the Force Order Entry to function.
When Force Order Menu is set to 0, no POS Screen Menu is displayed when pressing the ENTER button to go to the Tender Screen.
When Force Order Menu is set to a Code that refers to a POS Screen Menu, the entered POS Screen Menu will be displayed when pressing the ENTER button to go to the Tender Screen.
The POS Screen Menu can be configured to include any additional Stock Items or Instructions to include before taking payment.
The Force Order Menu will only be triggered when Stock Items are sold that are linked to a Department which has the Sales Prompt/Inhibit Pre-Paid Sales checkbox enabled (configuring this checkbox is outlined further below).
Force Order Entry
The Force Order Entry option will require each sale to have an order number entered before the sale can be finalised.
If the operator does not enter an order number, the next consecutive number will be allocated automatically.
Go to Setup > Yes/No Options > POS Screen > enable "Force Order Entry".

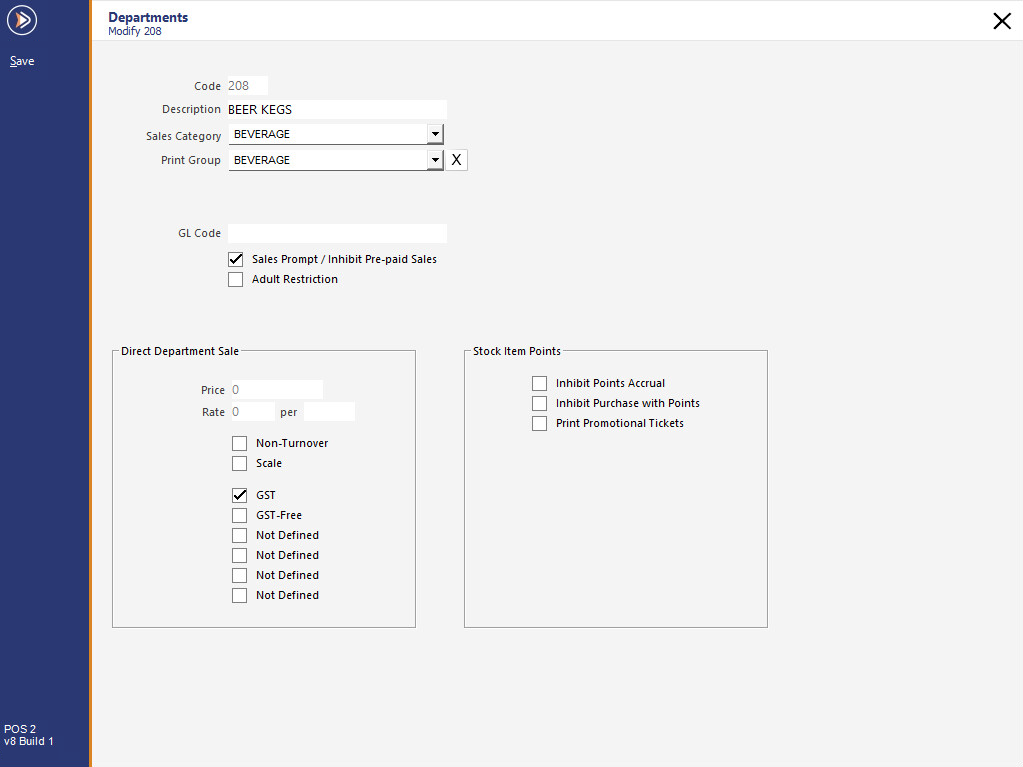
Sales Prompt/Inhibit Pre-Paid Sales
An Order Number entry prompt will be displayed when any items are sold which are linked to a Department that has this option enabled.
When the Order Number entry prompt is displayed, an order number will need to be entered by the operator before the sale can be finalised.
If a number is not entered, the next consecutive number will be automatically allocated to the sale (using the number range entered in the Show Order fields configured above).
Enable the "Sales Prompt/Inhibit Pre-Paid Sales" option for each Department that requires the Force Order Entry function.
Go to: Back Office > File > Sales > Departments > Modify a Department.
Repeat this for each Department that requires this functionality.
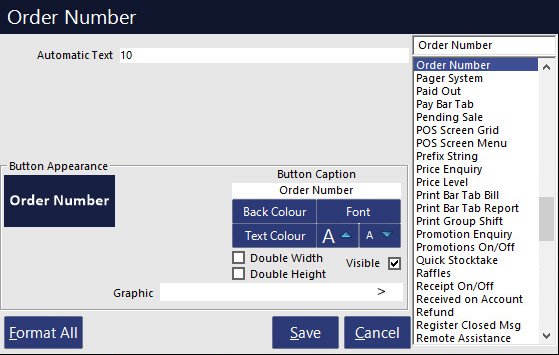
The Order Number button function has an Automatic Text field to enable the button to be configured with a default order number. You don’t have to use this field.
Go to Setup > POS Screen > POS Screen Setup > Layouts > Buttons > Function: Order Number > Automatic Text: Enter a number for an order number, repeat as required.
The Order Number button function supports an on-screen keyboard from v9 Build 14 and newer.
The on-screen keyboard can be used to enter alpha-numeric Order Numbers.
Note that the Keyboard functionality is not supported when the Order Numbers option is enabled in POSServer.
Go to: Back Office > Setup > Global Options > Miscellaneous > POSServer > ensure that the "Order Numbers" option is disabled.
If the POSServer Order Numbers option is enabled, the Keyboard will not be displayed.
If disabling the POSServer Order Numbers option, this will stop POSServer from centrally issuing Order Numbers to all POS Terminals in the venue.
Therefore, it is recommended that a unique Order Number Range is assigned to each POS Terminal (go to: Back Office > Setup > POS Terminals > Modify > Miscellaneous Settings > General > Show Order).

